Tuesday, December 30, 2008

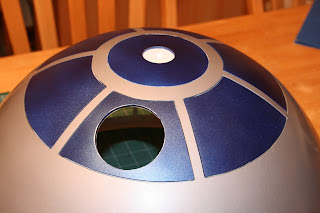
Well, I'm off work for a week, which gave me a little more time with my pal Artoo. This past Saturday, I cut the support ring for the dome to allow me to mount it to the frame. I used some scrap plastic tubing that worked perfectly for spacing. I would still like to test fit the skins on this week, but I'm happy with the progress with the dome.
I managed to clean up the cut outs on the inner dome and was able to mount my resin pieces. They're not permanent yet, but they do give the dome a more finished look. The spin on the rockler bearing is very smooth. I had been planning on getting styrene to make the legs, but I'm thinking of putting off the legs for a little while and spending the money on a motor and mount kit to get the dome running... or at least a jump in that direction.

Monday, December 22, 2008

Continued Dome Work

Winter weather and storms cancelled my plans for the weekend, so I found a lot of time to get work done on the dome. I mounted the radar eye to the dome and also installed the lower section of the inner dome and mounted the majority of the panels to it. I still have some trim work to do to get everything evened up. Of the 4 panels that still need to be mounted, two of them need circular cutouts and are awaiting parts so I can size up the cuts properly. One just needs trim work on the inner dome section prior to mounting. I'm also deciding whether or not to add the red led panel on the side. I have the panel, just undecided at the moment if I'm going to do it or not.

Monday, December 15, 2008

More Dome Progress


OK - the Christmas holiday is just around the corner, which means time with my buddy Artoo is going to be somewhat limited. I did find some time to work this past weekend and made some significant progress on the dome, although I ran into a common issue with the dome. The inner dome would not sit properly inside of the outer dome and thus created a 1/4" gap at the top. Sooooo.... I resorted to cutting the top off of the inner dome about 3/4 of an inch below the pie panels. This smaller section now sits flush with the top of the dome. I adhered this with the VHB tape that I picked up from Uline.com. All panels with the exception of the HP panel are also mounted with the VHB tape.


I also cut the center out of the dome base ring. This will allow me to access the electronics inside of the dome and seat the dome on the Rockler bearing. I'm not sure how the other C&D dome users are building their domes, but this is the route that I chose. The center has the R2Builders Logo on it, which I plan in turning into something creative. I picked up wood to create an inner ring for the dome to provide support as well as to give a platform to mount to the Rockler bearing, over the base ring. I plan on keeping the base ring as a separate component of the dome.

Monday, December 1, 2008

Frame/Parts update


Made some more progress with the frame this weekend. My support rods are installed - all except one as I was short by one machine screw. I picked up a Rockler bearing and was able to modify and mount it. Found something out to share - There are 8 plastic feet on the bottom of the bearing, I removed 4 of them to drill the holes through to mount it to the frame and left 4 feet still attached. Keeping in mind that this is aluminum and will bend, when I mounted the bearing to the frame, I added two flat washers between the bearing and the frame to match the spacing of the feet. This kept the bearing level as I tightened it to the frame.


I started cutting the dome ring for the C&D dome. Once that is complete (along with some clean up on the inside dome), I'll be able to mount the dome to the frame.

I also got a start on some of the misc body parts as well. Here are my first two coin slots. One is finished, the other I still have a couple pieces to add. The tape is just adding additional support to the glue and will not be seen. I used scrap pieces from my frame to get the profile.

Monday, November 24, 2008

Skin Update


Skins are cut and ready for sanding. Here are some pics of what I have done. These are just sitting in place, nothing has been attached yet. I reset my door on my frame last night as the lock washers were digging into the frame. They have been replaced with standard flat washers. I added one additional washer on the bottom of the door to raise the door slightly. It now moves with no contact to the bottom of the frame. My VHB tape is due to deliver today, so I may be able to mount the skins to the door this week.

Tuesday, November 18, 2008

Skins/Body update

I've been working over the last couple days on the back skins. All of my panels are cut and the back door panel has been removed from the inner layer. I test fitted the inner skins on the frame and so far - so good. Front skins need some final cleanup and then sanding and mounting.

Plan for the two weeks: Order remaining resin pieces for dome (HP's, PSI housing), Obtain Rockler bearing.

More pics to be posted soon..

Wednesday, November 5, 2008

Radar Eye Lens


Just a quick pic of the lens that I made from a 2 liter pop bottle. This was done about 3 weeks ago.

Wednesday, October 29, 2008

Off topic - two week break

A little off topic, but I finished my other project last night. Took me almost two weeks to complete. My family participates in our church's Awana program. Both of my girls are clubbers, my wife and I are leaders in different clubs. The group that I lead participates in a pine wood derby grand prix every November, and not just the clubbers, but leaders from most of the groups as well. Last year, my first year, I was challenged by the Commander that she would take best of show. I built a version of Lightning McQueen from the movie, Cars. This year, I was challenged by the Commander and my co-leaders as well to "up the ante".... So, I just had to choose Mater.


Umm.... did I mention under body lighting??? I have issues...

Hmmm..... Maybe next year, something StarWars...

Ok, back to building a droid.... During my time off, I was able to complete my radar eye. The lens was made from a 2 liter pop bottle and looks great!!! I didn't have time last night to get a picture of it, but I'll update the site soon.

Tuesday, October 14, 2008

Dome Work Continues


I made progress this past weekend with the great weather we had here in NY. I clear coated the metallic coat of the dome and all seems to be holding nicely. Took several coats to seal the paint, but it hardened pretty well overnight. I was able to add the blue on the bottom ring and the top of the dome. Here's some pics of the panels that I have painted taped to the inner dome.


I have yet to cut the base and the inner dome. I have another project to work on in the next two weeks, so progress on Artoo will slow down for a little while. I hope to get the base cut and ready to paint in about two to three weeks.

Tuesday, October 7, 2008

The Race Is On!!!!


I woke up this morning to frost and 30 degrees outside of my house. Not much time left to finish my painting this year. Last night, I put some base coats of chrome on the outside dome. Two coats and a night to rest it. Weather was a little on the cool side, close to dropping below 50 degrees while I was painting. Might hit the 60 degree mark this week, but I'm estimating that this will be my last week to paint for the season.

Anyway, here's what I have from last night. Nice reflection from the chrome paint. I'm using Kelly Krider's suggestion of the Rustoleum Chrome Metallic, but I didn't care for the clearcoat on the test strip that I did. This paint doesn't recommend a topcoat finish, but I may need something to match the sheen to the blue panels.

Monday, October 6, 2008

Dome Work


Finally finished cutting all pieces out of the dome. I put a coat of primer on yesterday and let it dry overnight. The weather is starting to get cooler, which increases dry time, so my painting process is slowing down. I'm hoping to get the chrome color on today and let it cure for a while before I mask it off to apply the blue areas (top of dome and ring on bottom). Here are the latest pics. The panels are just set in place and not centered.

Monday, September 29, 2008

Frame work

I found some time this weekend to work further on Artoo. The weather wasn't that great this weekend, so painting any parts for the dome was out of the question. So..... I worked and was able to all but complete the frame on Sunday. Here's some pics of what I accomplished.

I have yet to attach the skirt ring on the bottom, and I've omitted the internal trays as the panels that will cover them are not going to open. The rear door is only temporarily attached with machine screws, so I can get an idea of how I want to open and close it. As of yet, I don't have a latch system in place. I have some of the hardware to finish off the frame and will have to find time later this week to work on that, but for the most part, it's finished.

I couldn't resist setting up the last pic....


Monday, September 22, 2008

More Dome Work


I found some time last night to continue working on the dome. I'm about 90% done with the cutting and *hopefully* I'll be able to get this painted before the weather turns bad. I also started putting some parts together for the A&A frame. This is the rear door, front utility arm carrier, and internal trays.


Monday, September 15, 2008

Frame Arrived!!!

My A&A frame arrived this past Friday!!!! Sooooooo........... Saturday was spent looking it over and cleaning all of the residue of the cutting process off of the parts. Parts were tagged and I even started assembling a couple pieces (the front utility arm carrier and the rear door are done)

Pictures to follow...

Monday, September 8, 2008

Dome Work


More panels cut. I was able to remove 5 panels yesterday. The two larger panels on the side and back are scored and ready to come out, but I'm keeping them in place for structural support. These five panels are already sanded and painted.
My A&A frame should arrive any day now. Can't wait to get that assembled!!!!

Wednesday, September 3, 2008

Radar Eye


Here is my painted radar eye. There are some imperfections on the piece that I chose to leave "as is". My design is not going to be too worn, but I don't want him having a "fresh out of the factory" look either. Slight imperfections, chips and scratches are welcome here.


On a side note, I finished cutting my pie panels out of the dome. Two panels are painted and complete. Four more with base coats of paint are currently drying. I chose to go with Rustoleum's Cobalt Blue Metallic without the purple undercoat... not quite true to Artoo's coloring, but close enough for my droid.

Monday, September 1, 2008

Early work


Here are some pics of work in progress. These are from earlier this year. So far, I have 4 panels for the body (skins) with pieces cut. They are almost complete, but waiting on a frame before I make the final cuts.


This is early work on my C&D styrene dome. The paperweight on the left side is actually the Radar Eye that will mount onto the dome. (I'll have a better pic of that later..) The panel layout is complete and I am in process of cutting all of the panels out. They will be painted and then re-mounted later in the build.
While many builders work with powered rotary tools, due to the type of material, I chose to cut by hand. I found a saw blade that fits my Xacto set, and this seemed to cut evenly. I have a long way to go, but so far, my cuts been pretty even. The blade size allow me to cut freehand as opposed to setting up a guide.

In the beginnning....

Welcome to my blog spot. This diary has been created to document my progress in creating a full scale replica of an astrodroid from the Star Wars universe.

At this point, I'll lay out the disclaimer - this is not an officially licensed replica and is in no way associated with Lucasfilms. This is a fan built project based on a character created by George Lucas. The intention of the builder, this diary, and project is purely for the enjoyment of the builder, visitors to this site, and of course, those who will eventually come in contact with a "real" astrodroid.

With that said, I welcome you to visit often to check on my progress. More will follow soon...