Tuesday, June 30, 2009

Layered Shoulders

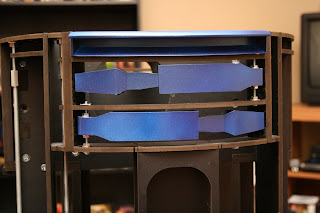
I got a start on my layered shoulders. The first one is glued up and ready for glazing putty to seal up the seams. I haven't attached the layer between the shoulders and the leg as I will paint the edge of that first. I also need to come up with a way to attach these to the legs so they can be removed for maintenance. I like Dan Baker's idea with the speaker mounts, but not sure if I can do that with my leg design. I added reinforcement bracing, so I have half of the open space of the original design.
I received a couple more parts this week. My 12v power distribution board arrived from Dan S. and I also received an amplifier for my soundboard. Hopefully, I'll be able to wire up and test my wireless sound system in the coming weeks.

Monday, June 29, 2009

One step forward....

I balanced out the utility arms so they would fit with the skins, however, after looking at the skins, I'm not happy with certain areas. The area around the utility arms needed to be cut open to allow the swing of the arm to pass through the opening in the skin. This makes the whole opening look way too big, even though the arm itself is barely passing through. It doesn't look too bad in the pics, but up close, it looks rough and oversize.
I have also been dealing with a pot belly on Artoo. The skins are nice and tight around the top and bottom of the frame, however, the center area around the bottom of the utility arm carrier and the front vents is about .25" from the frame. This makes the Utility Arms appear recessed, even though they are flush with the outside edge of the frame. I have attempted to pull the middle tighter, but I can't seem to get that section to sit properly. I have the front vents on order from Marco and the panel that fits around those vent surrounds may pull in some of that area back into shape, or at least a not so noticeable shape. If this doesn't work then my options will be to:
A. Re cut the utility arm covering and splice it to the existing skins.
B. Order rough styrene and re cut the skins altogether. This was a 3 month process for me the first time around.
C. Order the laser cut skins from Andy.
I'm not really crazy about either options B or C. This may just be the nature of working with styrene as it is a flexible material. I can't really glue the material down to the frame as I would like to be able to remove the skins for maintenance if/when needed. I need to wait on my other part orders to arrive, but all in all, I have got some thinking to do.

Friday, June 26, 2009

Utility Arms and Large Data Port

I spent a good portion of last night installing the utility arms. Yesterday I found some nylon inserts for the utility arms to protect the screw hole from wear from the threads. I built up my hardware and....

It failed.
The nylon insert fit with a number #8-32 screw - the only size I could find with an OD of 1/4", which is the diameter of the hole in the utility arm. Although it seemed like a good fit in the store, when installing it, there was a little bit of play within the insert, and the arm would dip at the unhinged end. I had built the lower arm assembly with standard machine screws, nuts and washers. Problem was, when all was tightened, the arm was evenly horizontal. However, when the arm was opened several times, the components would loosen, and the arm would slump down.

I used a different method on the upper arm, using a modified t-nut at the top. I had to remove the prongs to get it to set as low as possible as the Large Data Port (LDP) needed to sit on top of it. This arm, once tightened, stayed in place. After several attempts at correcting the lower arm, the lightbulb clicked on and I replaced the assembly with one similar to the top arm assembly and.... well, it worked!!

The skins will need some modifying to allow the arm to swing out freely, but otherwise, fit pretty well.
If you look at the unhinged ends of the UT arm carrier, you can see a small bumper on the side wall. This will allow the arm to come back into the proper position and also protect the tip of the arm from colliding with the plastic wall of the frame. They are not visible with the skins installed.
The LDP is installed with double sided tape, left over from my skins. I used a layer of .040" styrene to even the frame area with the t-nut. It's a very strong bond, but I have been able to pry the tape off of styrene with very little damage. The mount is very secure, but in emergency, I can still pry the dataport off if needed.

Tuesday, June 23, 2009

Buncha Stuff...

I've been working a little at a time over the last few weeks. I'm spending time studying to up my certification level for my job and Artoo is part of my quiet time to take a break. I have a bunch of parts on order either due to ship or due to arrive. Keith is back - and the budget builders are rejoicing!!! I've already ordered and received some resin from him while waiting on other parts.
So, here is where I stand...
- Second leg construction is complete. Skins are mounted around the shoulder, but I still have to skin the front, back and sides.
- I have a start on the first ankle. Most structural parts are cut and I have started gluing some panels together. No pics of this just yet.
- Resin Large Data Port is finished, and the resin Utility Arms are sanded and partially painted. I have yet to work on the power couplers that I purchased (one is pictured below, the other one is attached to the frame to test the fit)

Tuesday, June 2, 2009

Leg Progress and Dome Panel

I started work on R2's second outer leg. I should be able to finish the construction this weekend, time permitting. Again, I am foaming the open cavities to make the leg more solid. I am also reinforcing the structure for additional strength.

Yesterday, I decided to repaint one of the dome panels from blue to aluminum. I made the mistake of painting it incorrectly at first and it has bothered me since. I switched from using the chrome paint and this time used Rustoleum's Metallic Aluminum. It coats so much nicer than the chrome and doesn't take a week to dry. I still clear coated as it brought the metallic color down a little and made it closer to the rest of the dome. Once I weather him, he'll look much more uniform, although, after looking at the color on the panel vs. the rest of the metal color, I'm very tempted to just mask off and repaint the entire dome.

Must resist temptation....

Here's the pics.